We love sharing our favorite resources, books, classroom supplies and teacher stuff with you. When we do, we may earn money or products from the companies mentioned in this post. This does not affect our choices in what to recommend. Rest assured, we only recommend our favorite products to you! You can find our full advertising policy on the Partner With Elizabeth page.
If there was a golden rule for kindergarten it would be this – don’t assume they know anything. Start with the assumption that they are all blank slates. Then teach them what you want them to know. This is where I begin each year, and when I start with this mindset I see the importance of teaching procedures from day one.
Teaching procedures is the key to making your classroom run smoothly and efficiently. If you take the time to teach your class how to do things then I promise in the long run you will have more time to focus on the academics.
Today I want to share with you the steps I use to teach procedures in my classroom. Read it here or watch the video on You Tube too!
Step 1 – Procedures Start With You
Before you can teach procedures to your students, you must have an idea of what you want your classroom to look, sound and feel like on a day to day basis. This means that before school begins you need to think about these things.

Who says this first step can’t be fun! 🙂
Close your eyes and picture your classroom running just as you would want. What do you see? What do you hear? Now think about what you and your students need to do in order to get there. This is the creation of your procedures.
Step 2 – Put your Procedures into Simple Steps
Once you have thought about the procedure that will help you get to your ideal classroom, then it is time to put those procedures into simple, easy to follow steps. Think about your students when you do this. If you teach Pre-K or Kindergarten, the language and number of steps will be different than if you teach 3rd, 4th or 5th grades. I’ve always found that the K.I.S.S. method works well. Keep. It. Super. Simple.

Step 3 – Teach the Procedures to Your Students
This is the most fun and most important part of all. When I teach procedures to my students I follow a tried and true procedure myself.
-
Introduce the Need For Procedure
I generally have this discussion at the very beginning of the school year. We talk about classroom and how we want it to work so that we can all learn and have fun in the process. We discuss what happens when we all do things our own way, in our own time, and how this creates lots of chaos and confusion. Then we talk about what happens when we all work together. The students get it – they understand that by having set procedures their classroom will be a better place.
-
The Procedure
Now it’s time to introduce the procedure. We talk about what we want to accomplish and how we will get there. This is when I lay out the simple steps that I came up with. I generally create a simple anchor chart to help my students visualize each of the steps. This also makes a great tool for them to refer back to throughout the coming weeks and months.
-
Model the Procedure
After teaching the steps, its time to model what the procedure looks like. I do the first modeling. I get up and literally show the students what to do as I talk through the steps of the procedure. Then I ask for volunteers to model the procedure. I usually call on 1-3 students to give it a try. After each one, we talk about what went well and what could be changed. Sometimes we even model the wrong way. The students love this – and it is a great way to demonstrate some common things you could see without a procedure in place.
-
Practice the Procedure
Now it is time for the entire class to practice. Before we begin I once again remind them of the simple steps. Then we do it – we practice the procedure. After the practice we meet back together to discuss how we did. Then we practice again. We repeat the practice and discuss pattern a few times.
-
Put the Procedure Into Action
The final step in the process is using the procedure in the natural flow of classroom activities. Immediately after teaching a procedure, we do a learning activity that will use the procedure. This gives the students an immediate opportunity to put their new learning into practice.
An Example From My Classroom
In my classroom we move around a lot! We are on the carpet, at our tables, back to the carpet, at centers, back to the tables, etc. I think you get the idea. So it is very important for me to have a set procedure for how we will move around. This is our procedure for moving to the carpet for calendar, read aloud or a whole class lesson.
- From a table: Stand up, push in your chair, and walk directly to the carpet area. Sit in your assigned spot in your Ready to Learn position. (Yep – I teach Ready to Learn position as another procedure!)
- From a center: Quickly gather your supplies, return your supplies to the proper place, walk directly to the carpet area. Sit in your assigned spot in your Ready to Learn position.
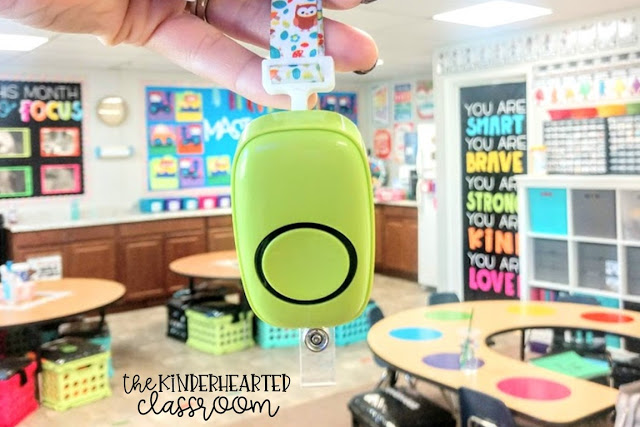
This procedure actually involves other procedures too. Before I would teach this, I would have already taught my students about Ready to Learn position. I would also have already taught my students about the doorbell and what it means. Don’t know about the doorbell??? Check it out here!
It’s also important to know that although I shared with you two alternatives for moving to the carpet, I would teach those at separate times to my students.
After introducing the procedure, then I would model. I would leave the carpet area and go sit at a student’s desk and pretend to work. Then I would ring the doorbell (or ask a student to do this) and model the proper procedures for getting quiet and giving attention to the teacher. Although this is not the actual procedure we are working on it is still a good reminder. Then when asked to go to the carpet (by myself or a “student teacher”) I would stand up, push in my chair and walk straight to the carpet. I would sit down and then model the Ready to Learn position (which is again a good review).
Next, I ask for student volunteers. One at a time they model the procedure for us too. After each student we talk about what they did well and what can be improved on. I don’t make these conclusions – instead the other students do. So this is a wonderful way for the students to learn how to compliment each other for things well done. It’s also a good way to learn about constructive criticism. {I think it is important to say here that from Day 1, I work very hard to make our classroom a place where learning is the goal. And that means that we don’t always do things right – but we can learn from our mistakes. By creating an environment where students feel safe to fail – the students are free to learn.}
Last, we practice as a group. I send the students to their tables to work on an activity. Something simple that can easily be interrupted and then continued works well. I ask the students to begin working. After about 2 or 3 minutes, I ring the doorbell and wait for everyone to stop what they are doing and look at me. Then I ask them to come to the carpet. Then once we are at the carpet we talk about how it went.
We look around the room to see if all the chairs are pushed in. We talk about whether there was any running or bumping into each other. We talk about how quickly we were Ready to Learn. Then we do it all again. We might actually practice 3-4 times, if needed. Sometimes we will times ourselves and set a goal. It’s fun to see if we can improve on our time during our practice sessions.
Then for the next few days as we get ready to move to the carpet, we do a quick reminder. At any time we can go back and model and practice if it is necessary. Pretty soon, it becomes a habit and the norm in our room.
I previously shared about My Favorite Classroom Management Tool. {The doorbell I mentioned earlier} In that blog post I detailed the procedures I use for quieting the classroom and getting my students attention. You can read all about it here!
Procedure Ideas
Here’s a list of some of the procedures I teach in my classroom.
- How To Get Quiet and Give the Teacher Your Attention
- How to Get and Put Away Table Supplies
- How to Move to the Carpet
- How To Move to Centers
- How to Line Up
- How to Walk in the Hallway
- How to Go to the Restroom
- How to Do Partner Reading
- How to Do Read to Self
- What to Do When the Classroom Phone Rings
- How to Sharpen a Pencil
- How to Unpack in the Morning
- How to Pack Up at the End of the Day
- How to Ask a Question
- How to Move Through Center Rotations
- How to Get Center Supplies
- How to Put Away Center Supplies
- How to Do Safety Drills
Safety Drills
I want to take a quick second to talk about safety drills. We all know the vital importance of these drills for the safety of our students and all the students and staff at the school. But it is also important to remember that for most of our students these drill are a new thing and can be scary. Before we do any school wide safety drill I always teach the drill to my students. We use this:

In this resource, I have put together a fun way to teach your students about these important procedures using a student book and class anchor charts.


This resource also includes an editable roster that can be used as a quick check any time you have to leave the classroom for a drill. There is also an editable parent letter that is great for keeping them informed on what their child is learning at school. This is a great way to help facilitate conversations at home. Remember, this can be scary for kids and being able to know that mom, dad and teacher are all there to help them makes it easier.
Finally, after successfully practicing each drill students receive a special bracelet showing that they are now a certified drill participant.

I have found that after using this resource, my students not only understand the importance but also enjoy learning about them too. This resource includes Fire Drills, Tornado Drills, Earthquake Drills and Lock Down Drills.
Wrapping It All Up
I hope that you found some easy to use ideas for teaching procedures to your students. If you have never taken this approach before, I suggest that you give it a try. Remember it’s okay to take it slow. My mantra at the beginning of the year is this “Baby steps now – for giant leaps later.”

[…] laying the foundation of classroom rules and procedures. I recently wrote a blog post about how I teach procedures during the first month of school. Once we have the basic classroom procedures in place I begin introducing […]